Use the desktop GUI
The Tegata desktop GUI provides the same vault management and credential operations as the CLI and TUI with a graphical interface. It includes a setup wizard, type-specific credential actions (for example, TOTP countdown timers), a settings panel, and an audit panel.
Unlike the CLI binary, which is designed to travel on the USB drive alongside your vault, the GUI is installed on your host machine. The vault file itself always lives on your USB drive or microSD card.
Install the GUI
- Windows
- macOS
- Linux
Download tegata-gui-windows-amd64-setup.exe from the GitHub Releases page. Run the installer and follow the prompts. The GUI is installed to Program Files\Tegata\ and a Start Menu entry is created automatically.
On first launch, Microsoft Defender SmartScreen may show "Windows protected your PC". Select More info, then choose Run anyway.
Download tegata-gui-darwin-universal.dmg from the GitHub Releases page. Open the disk image and drag Tegata to your Applications folder.
On first launch, macOS Gatekeeper may block the app. If prompted, open System Settings → Privacy & Security and select Open Anyway for Tegata. If Gatekeeper still blocks launch, clear the quarantine flag:
xattr -r -d com.apple.quarantine /Applications/Tegata.app
Linux has not been manually tested. These steps are expected to work, but if you run into issues, please open an issue.
Download the package for your distribution from the GitHub Releases page.
# Debian / Ubuntu
sudo dpkg -i tegata-gui-linux-amd64.deb

# Fedora / RHEL
sudo rpm -i tegata-gui-linux-amd64.rpm
The GUI requires WebKit2GTK. If the app does not launch, install the runtime package that matches your distro release:
# Ubuntu / Debian (newer releases)
sudo apt install libwebkit2gtk-4.1-0

# Ubuntu / Debian (older releases)
sudo apt install libwebkit2gtk-4.0-37
If the app still does not launch, see Troubleshooting.
Launch the setup wizard to create a vault
When you open Tegata for the first time, it prompts you to locate or create a vault. If your USB drive is already connected, select Open existing vault and navigate to your vault file. If you have not created a vault yet, select Create new vault.
The setup wizard guides you through:
- Choose vault location. Select the USB drive or microSD card directory where your vault will be created.
- Create a passphrase. Enter and confirm a passphrase. A strength indicator shows the estimated security level.
- Save your recovery key. The recovery key is displayed once. Copy it and store it somewhere physically separate from the USB drive.
- Add your first credential. Optionally add a credential immediately after setup, or skip this step.
The recovery key screen will not appear again. If you lose your passphrase without this key, your vault cannot be recovered.
Unlock your vault
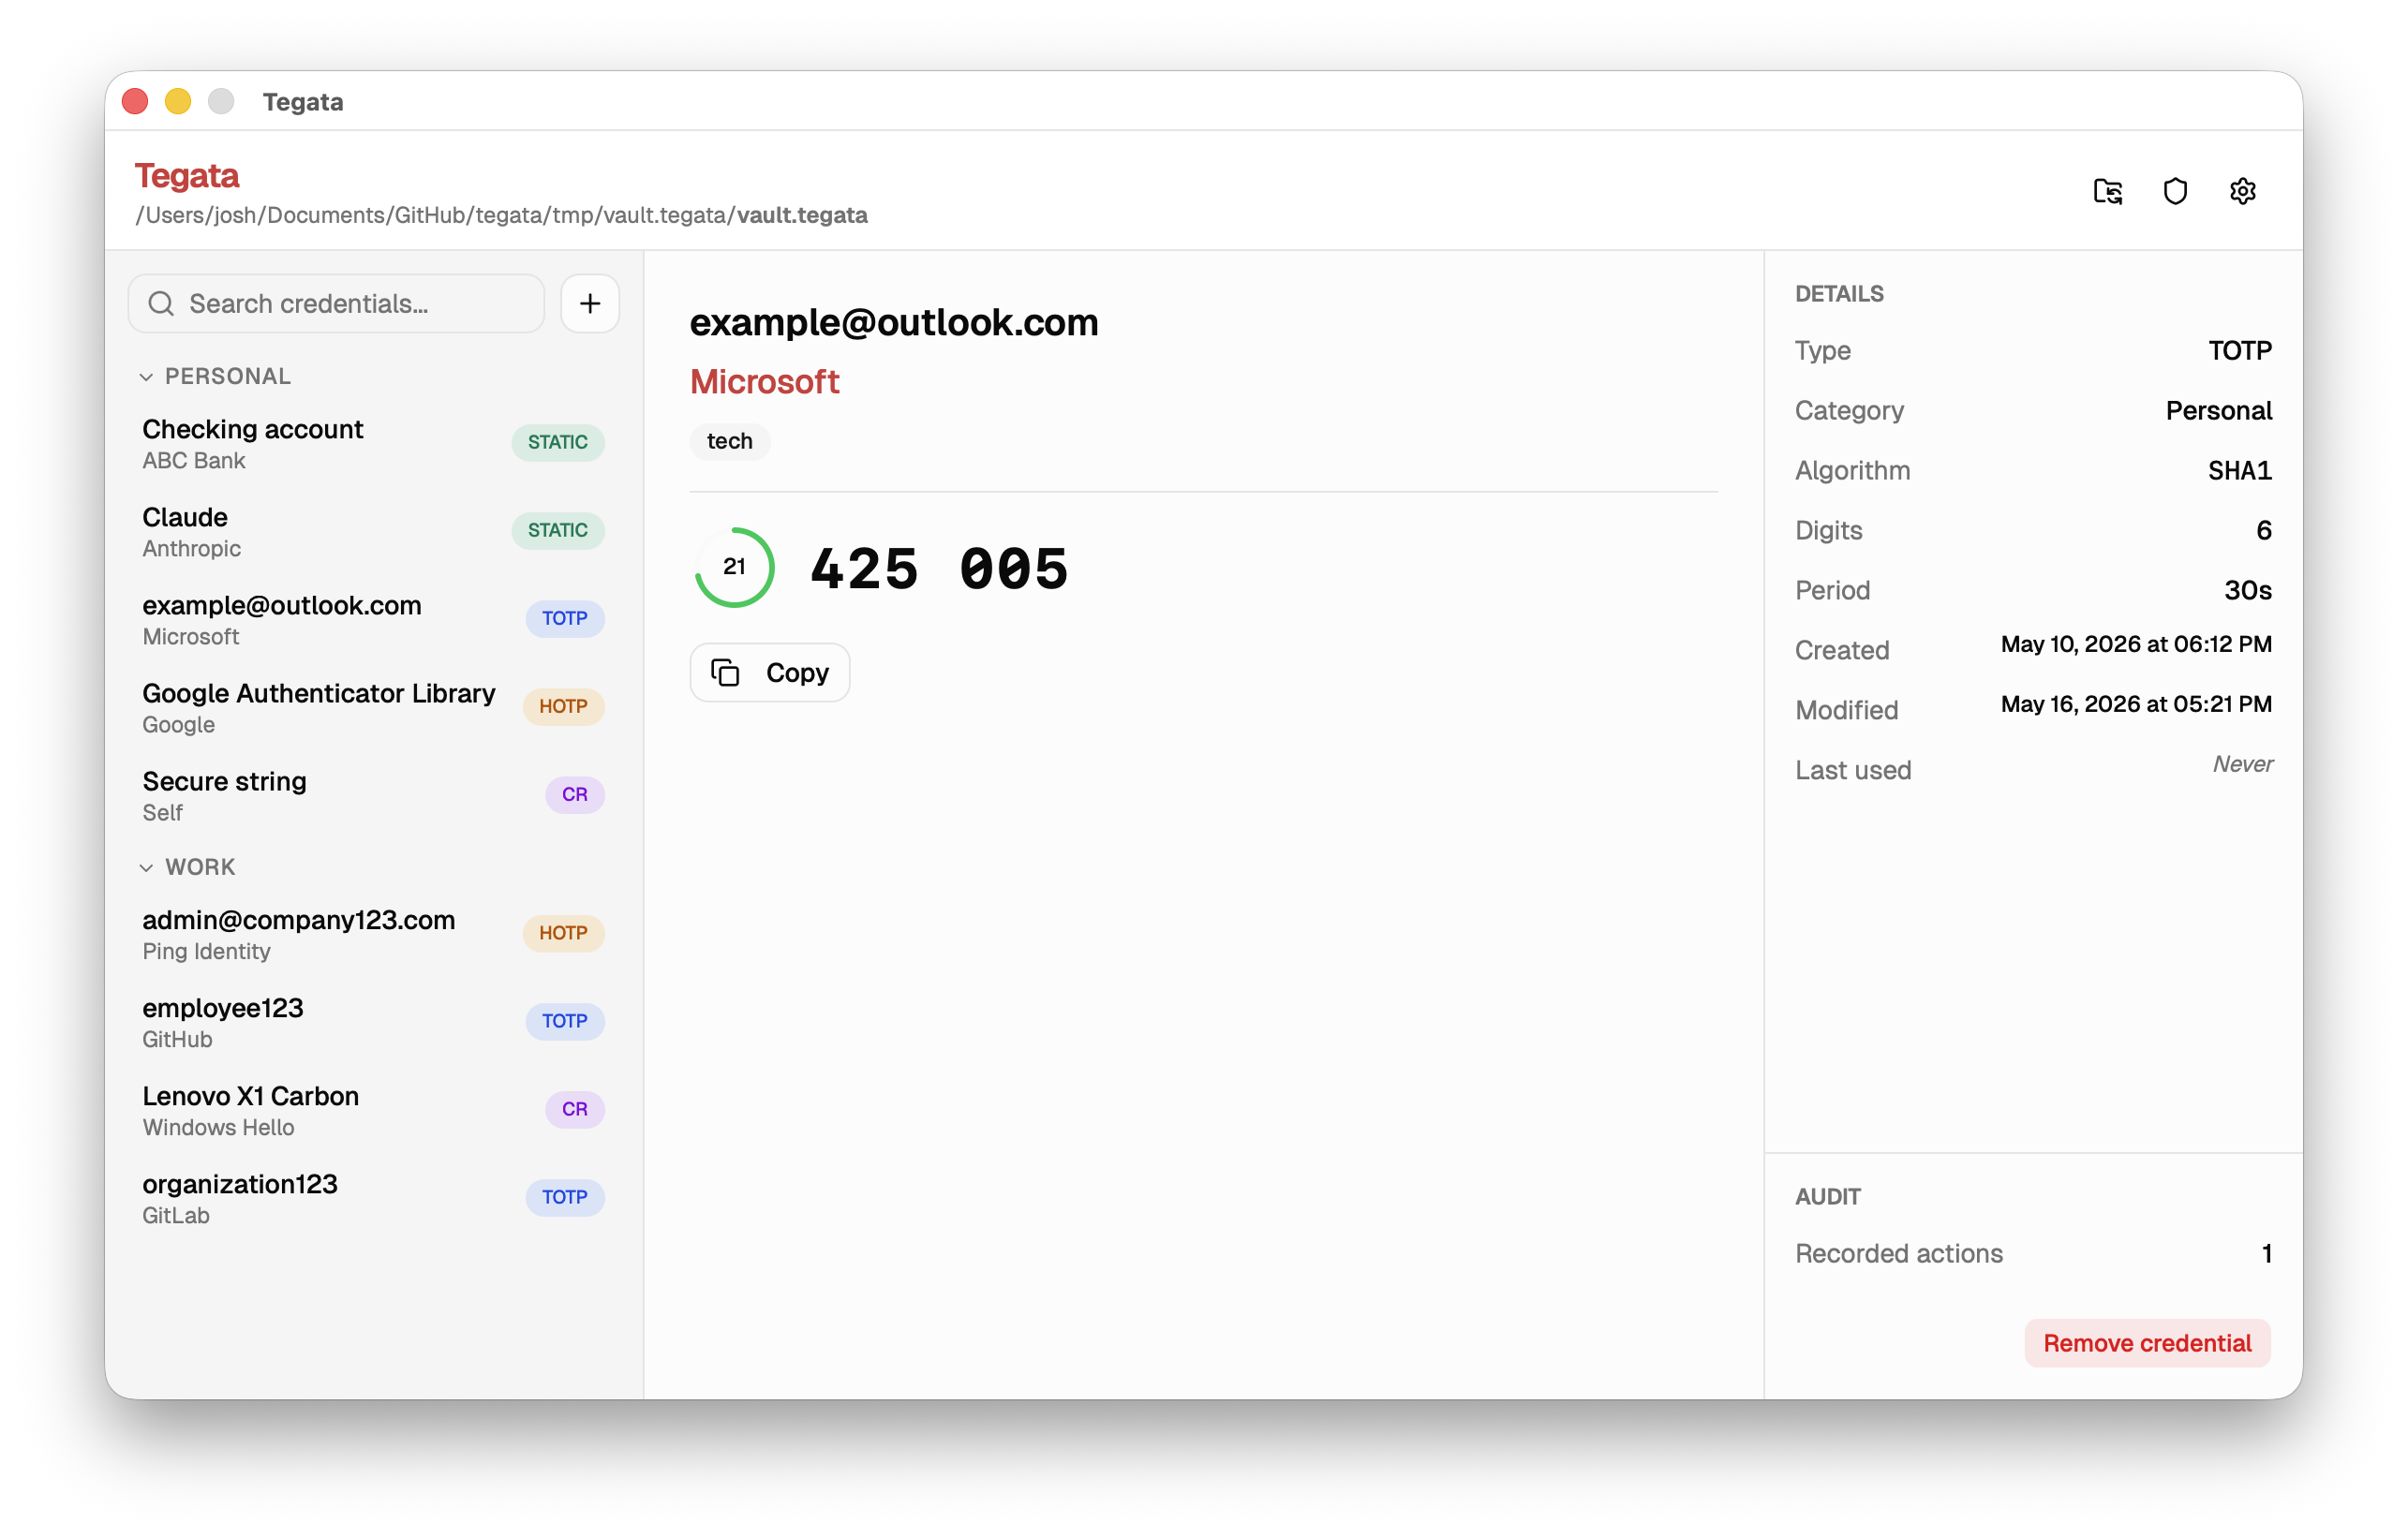
After unlocking your vault, the left sidebar shows your list of credentials.
Add a credential
Select the + button in the toolbar or the Add credential option in the File menu to open the add credential dialog.
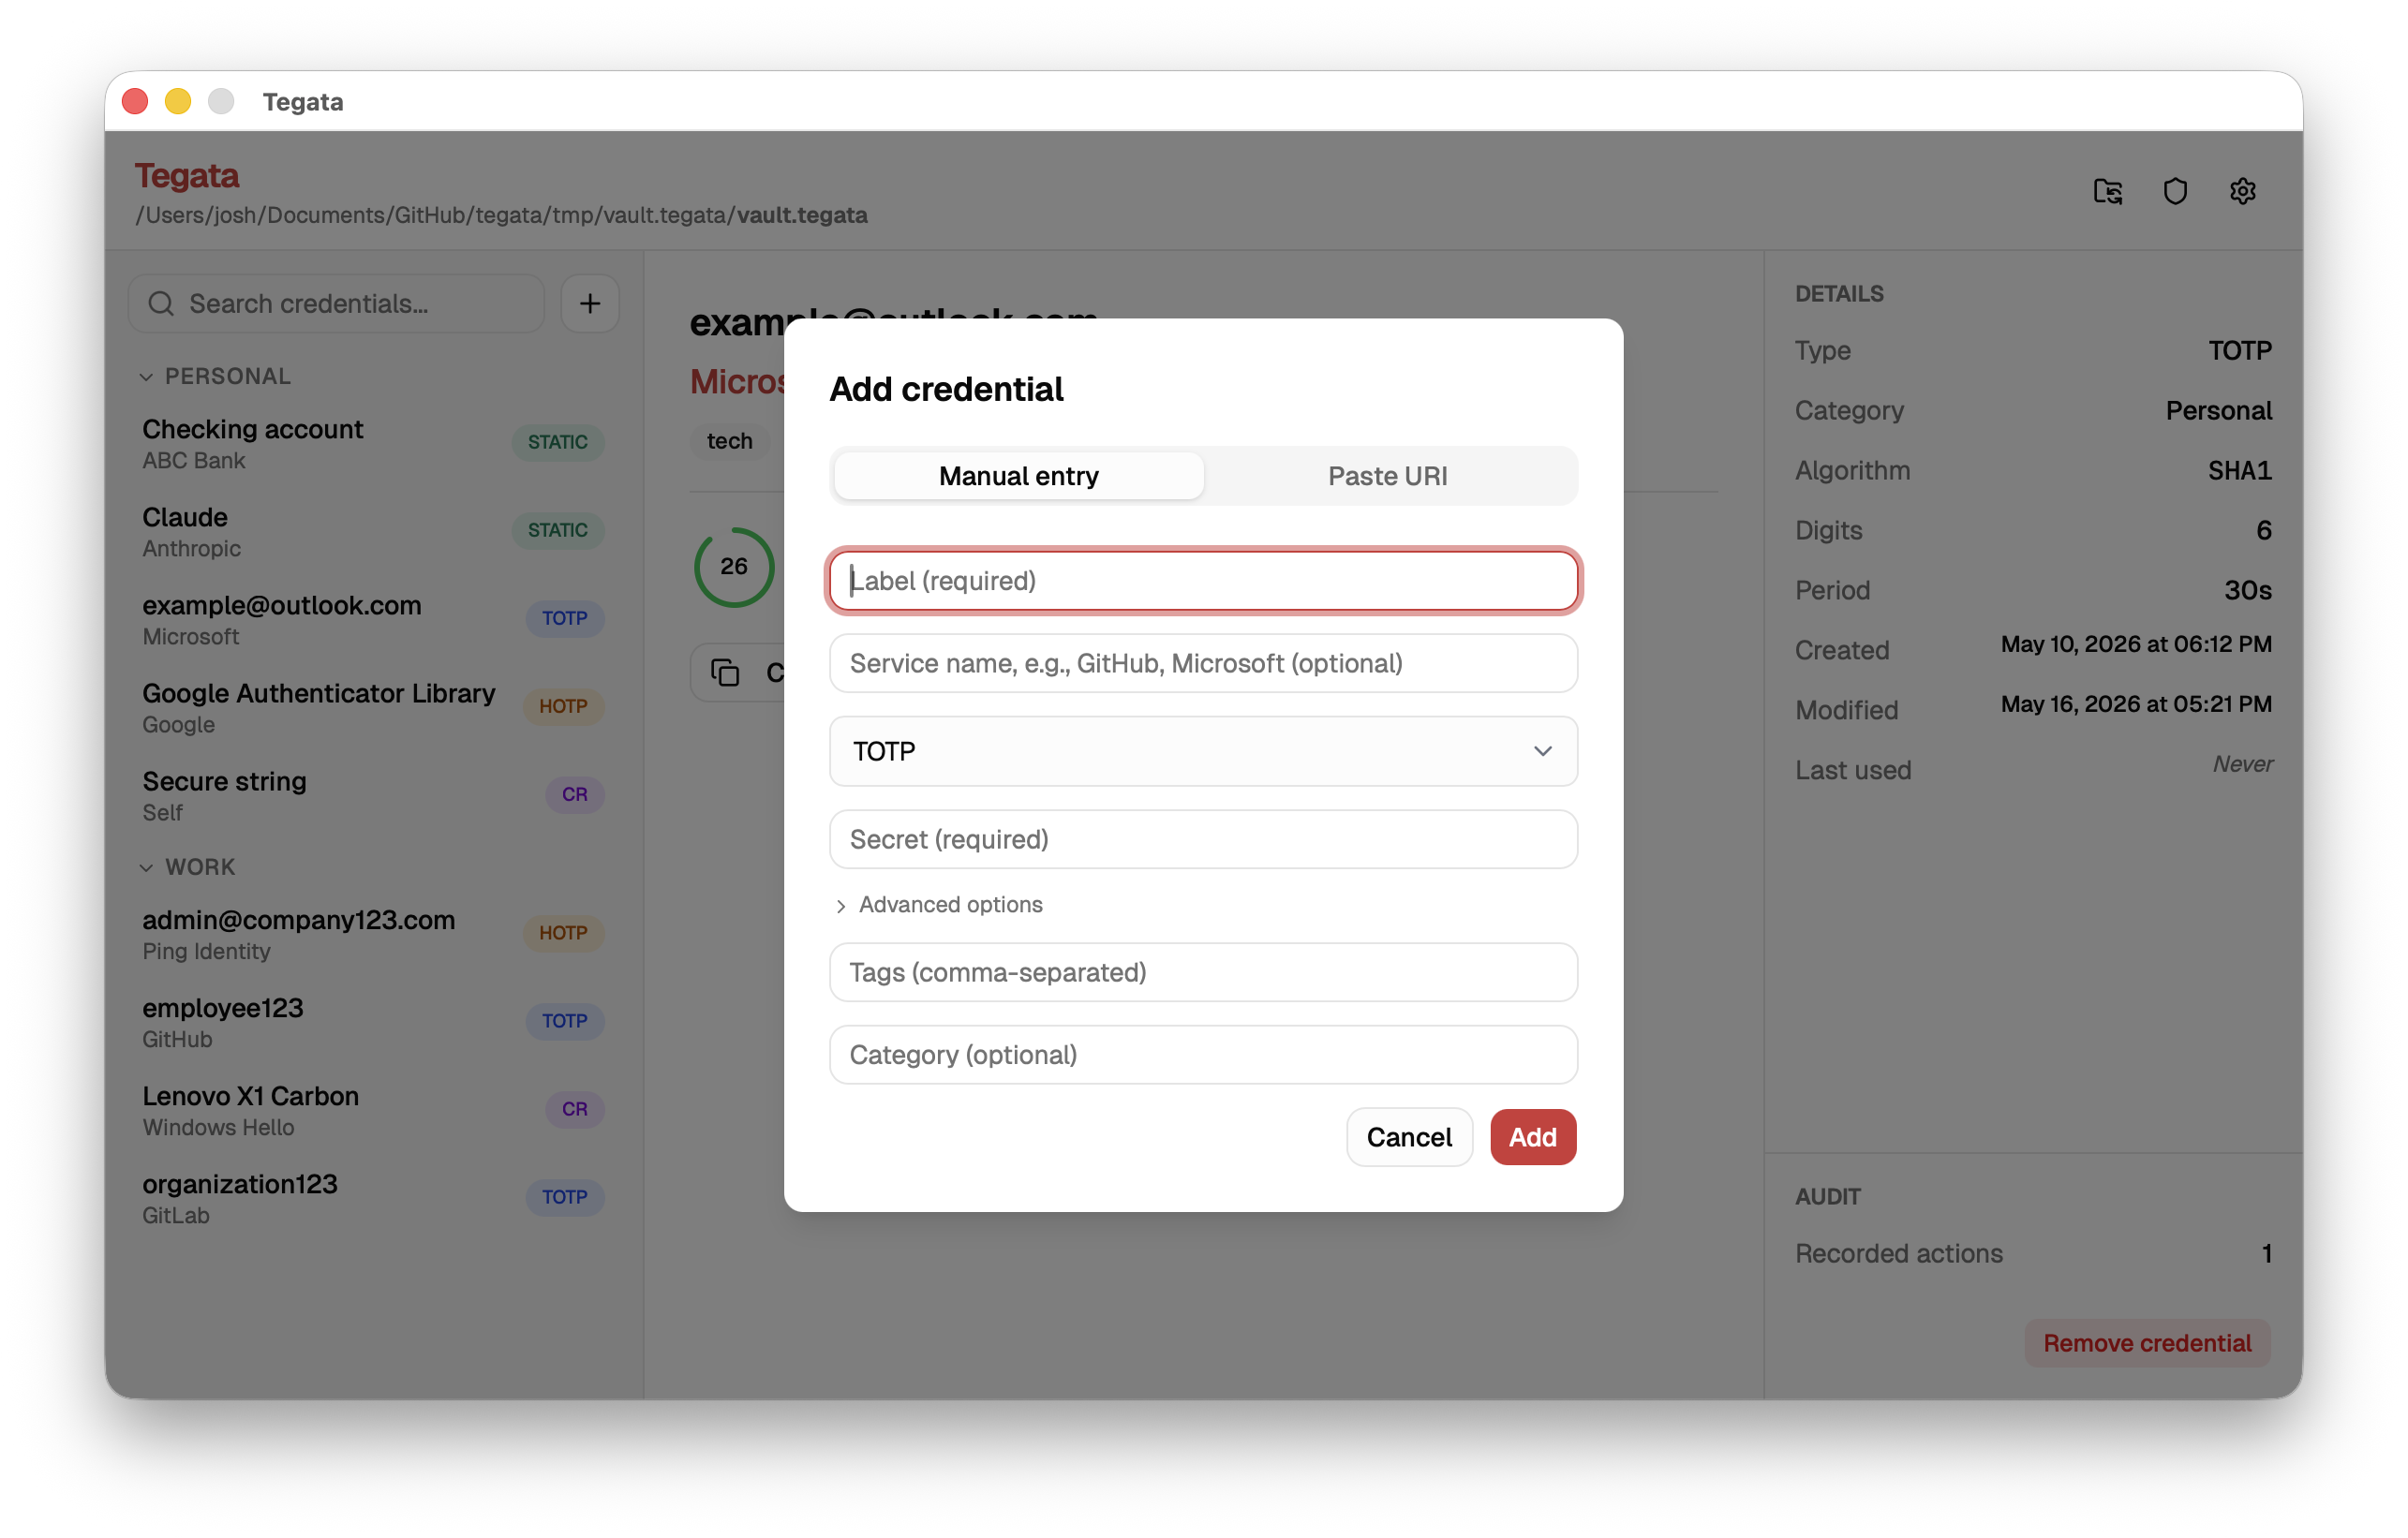
The dialog has four tabs corresponding to the four credential types: TOTP, HOTP, Challenge-response, and Static password. Fill in the required fields and select Add.
You can also add a credential by pasting an otpauth:// URI directly. Select Scan URI and paste the URI into the input field. The type, label, issuer, algorithm, digits, and period are populated automatically.
Use a credential
Select any credential in the list. The detail panel on the right updates based on credential type:
- TOTP: Select Copy to copy the current output to your clipboard. A countdown timer shows the time until the next code.
- HOTP: Select Generate code to copy the current output to your clipboard. The clipboard is cleared automatically after 45 seconds by default (configurable in Settings).
- Challenge-response: Enter a challenge string and select Sign. A signature will be generated. Select Copy to copy it to your clipboard.
- Static password: Select Copy to clipboard to copy the password. The password is not displayed in the UI. This is a security measure to prevent shoulder surfing and accidental exposure when using static passwords.
The clipboard is cleared automatically after 45 seconds by default (configurable in Settings). This is a security measure to minimize the risk of sensitive data lingering in the clipboard if you forget to clear it manually.
Edit or remove a credential
Right-click a credential in the list to access options:
- Edit tags. Add or remove tags for organizing credentials.
- Copy code. For OTP and static-password credentials, this is the same as single-clicking.
- Remove. Shows a confirmation dialog before deleting.
Configure the app settings
Select the gear icon or open Settings from the application menu to access the settings panel.
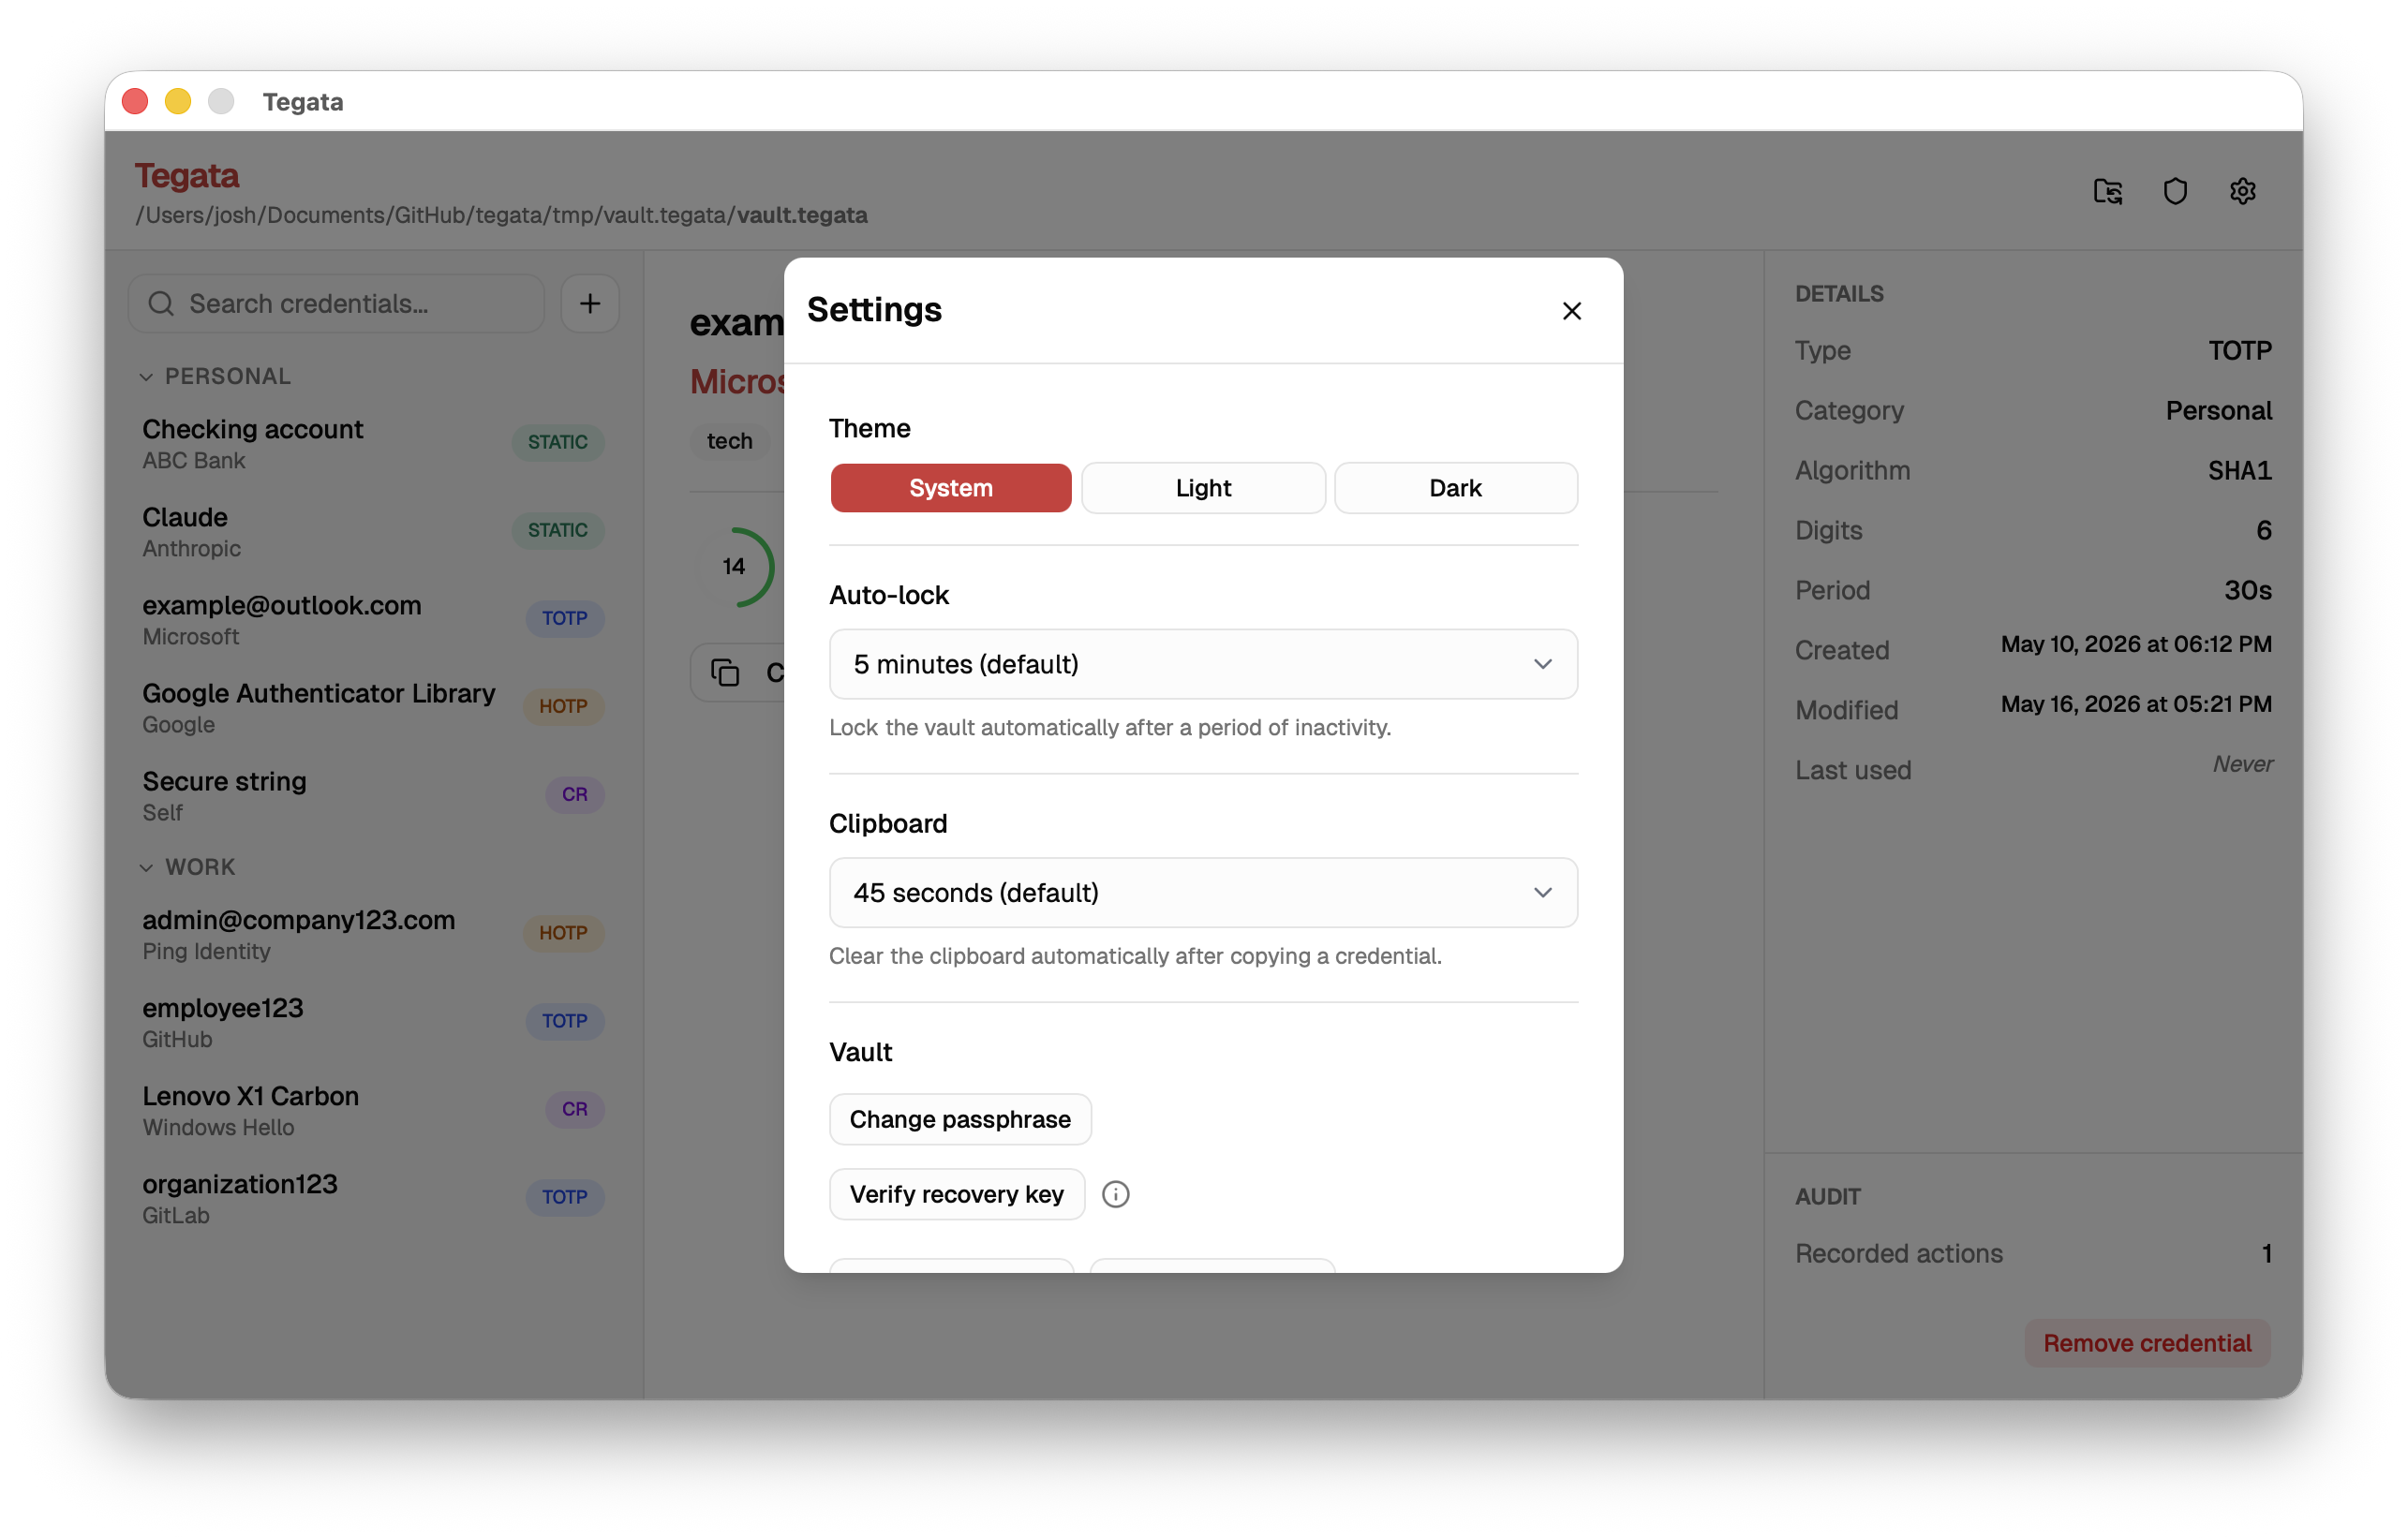
Available settings:
| Setting | Description | Default |
|---|---|---|
| Clipboard clear delay | Seconds before the clipboard is cleared after copying | 45 |
| Idle timeout | Minutes before your vault auto-locks | 5 |
| Theme | Light, Dark, or System | System |
| Audit auto-start | Start Docker audit stack automatically on unlock | On (after tegata ledger start) |
View events in the audit panel
The audit panel is available after enabling audit logging with tegata ledger start (CLI) or through the Settings panel in the GUI.
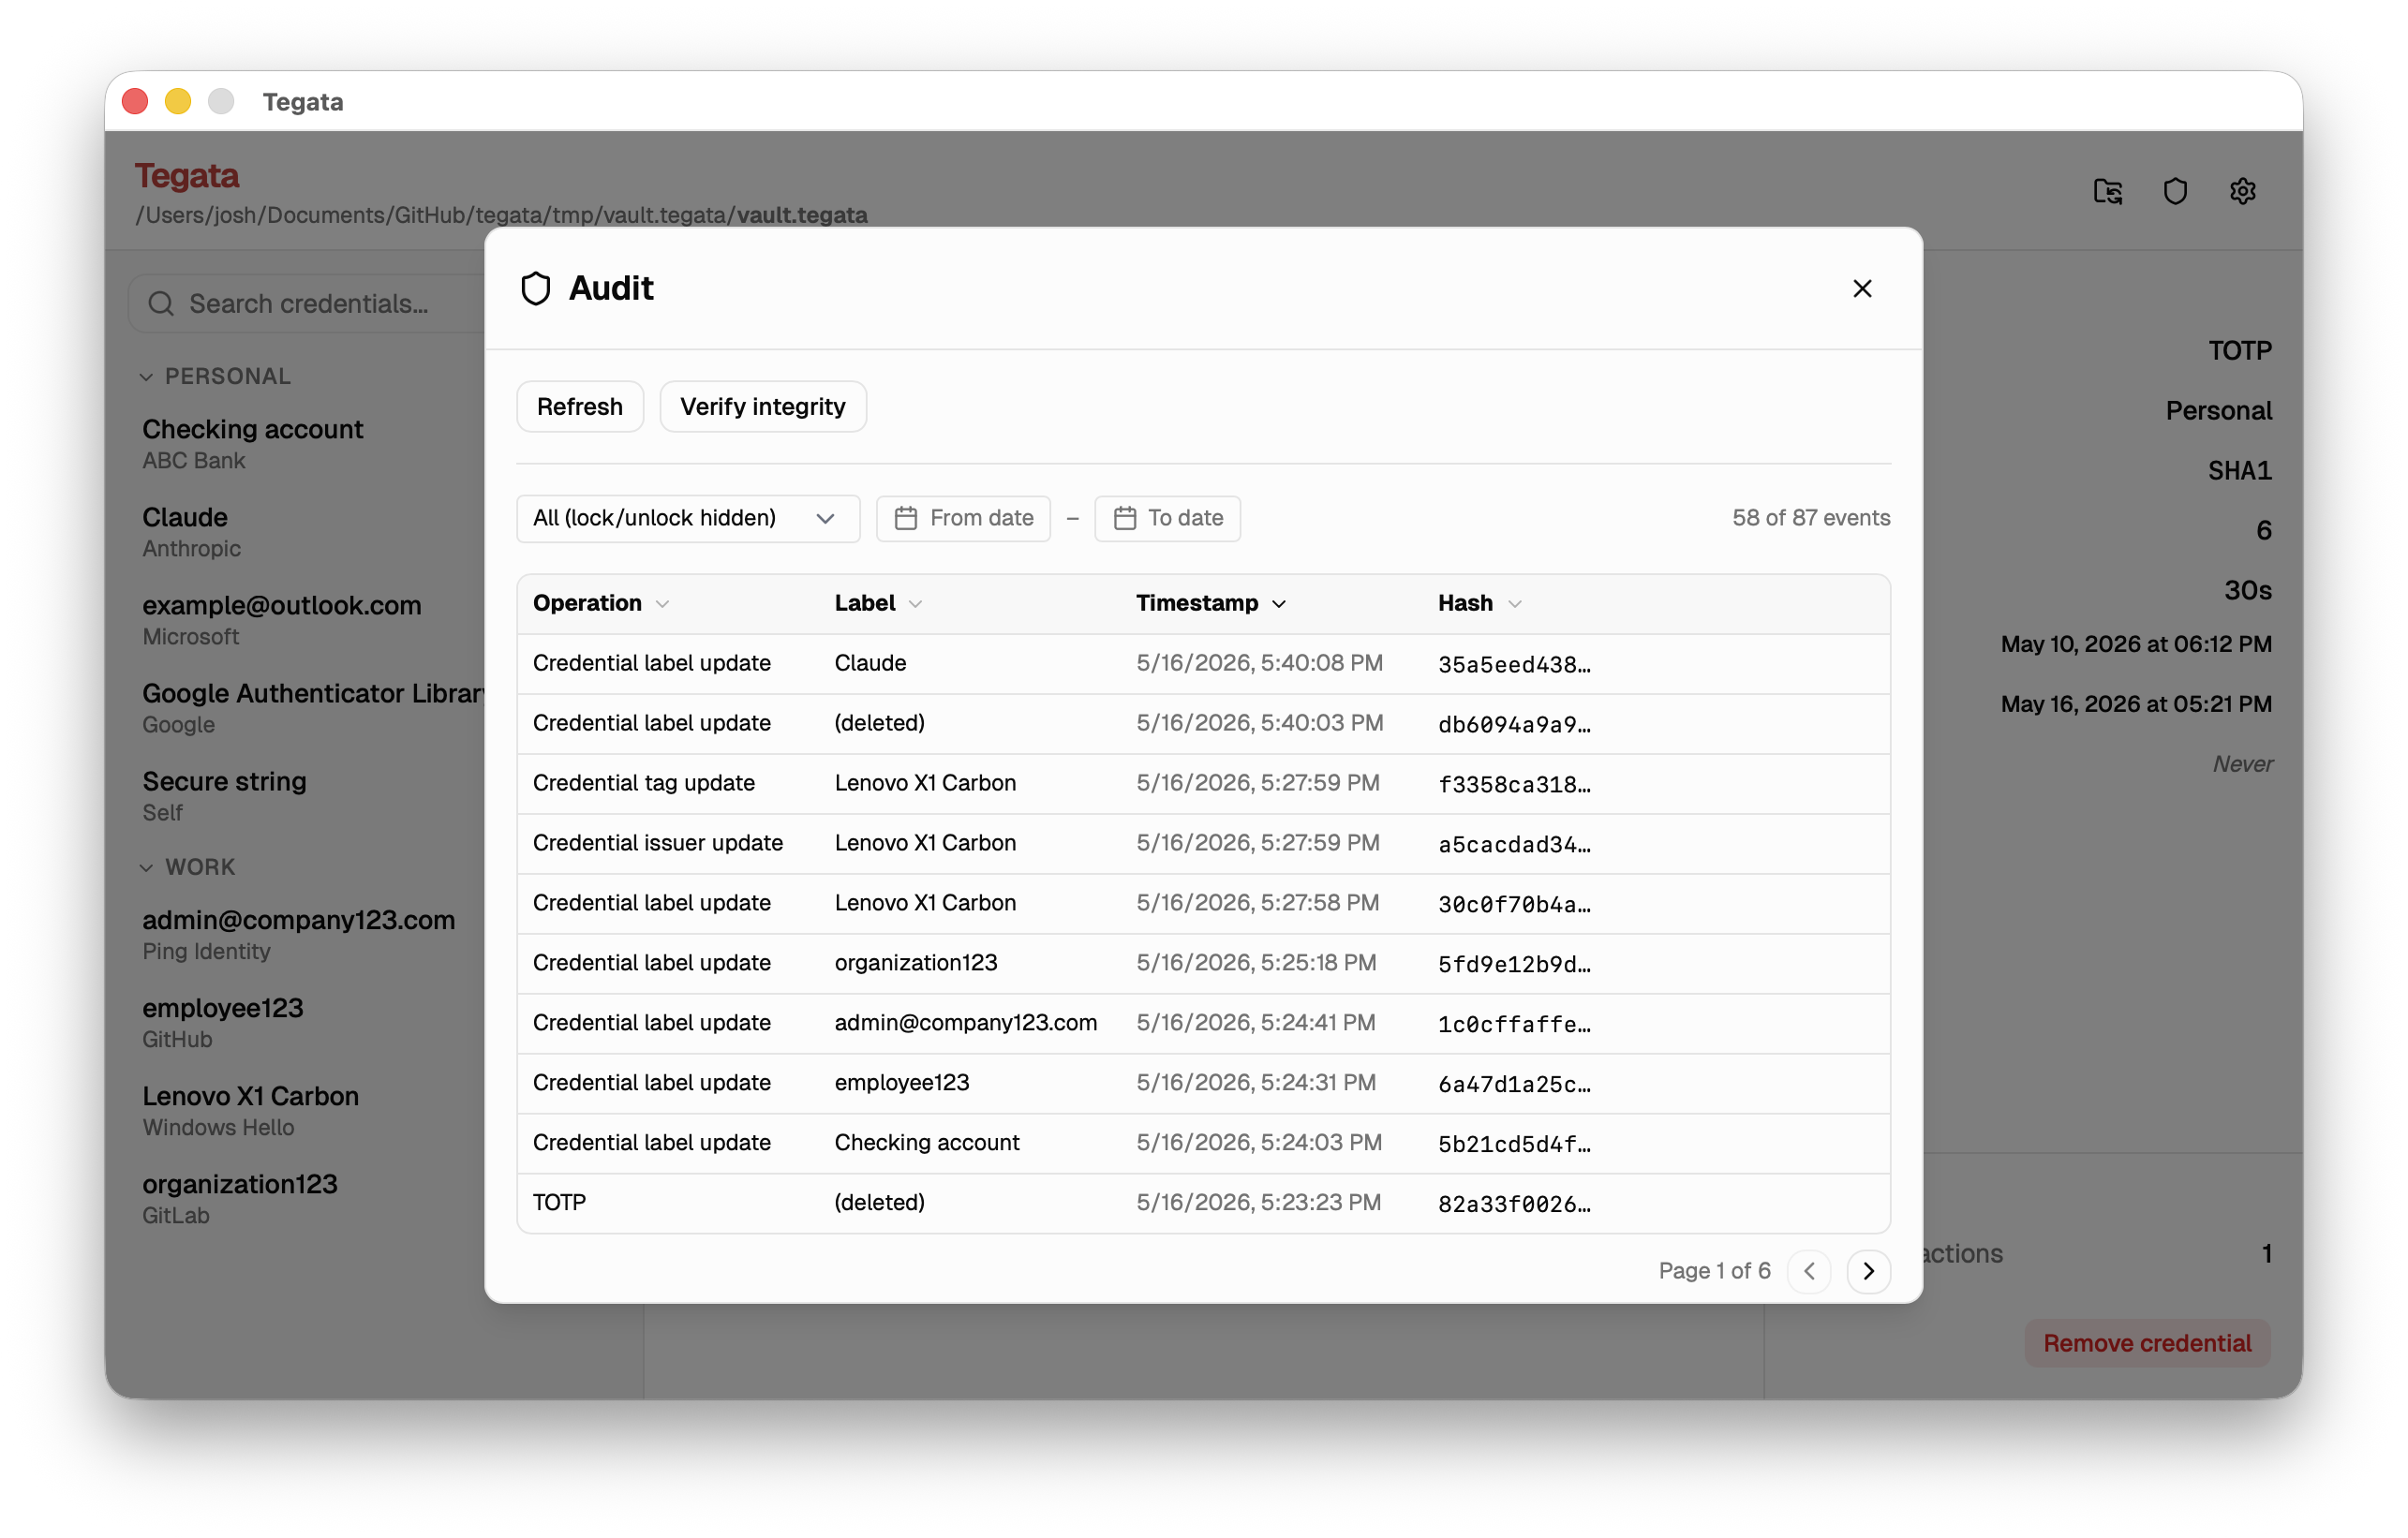
The panel shows a table of recorded events with columns for operation type, credential label, timestamp (UTC), and event hash. Use the date filters to narrow the range. Select Verify integrity to run tegata verify and check the entire audit chain.
Events for removed credentials show as (deleted) in the label column. This is expected because the label hash is preserved in the ledger but the plaintext label is no longer in your vault.
Manage your vault
Access vault management options from the File menu.
| Option | Description |
|---|---|
| Export backup | Create an encrypted .tegata-backup file with an independent export passphrase |
| Import backup | Merge credentials from a .tegata-backup file into the current vault |
| Change passphrase | Rotate your vault passphrase |
| Verify recovery key | Confirm that your stored recovery key is still valid |
| Lock vault | Lock your vault immediately without quitting |
Known limitations
- Passphrase in WebView heap. The passphrase is briefly held as a JavaScript string in the underlying WebView process. JavaScript strings are immutable and garbage-collected non-deterministically, so the passphrase may persist in the V8 heap for a short time after the Go side zeroes its copy. This is a known limitation of the WebView architecture. For guidance, see security best practices.
- No cross-compilation. The GUI binary requires a native build for each platform because it depends on the system WebView (WebView2 on Windows, WKWebView on macOS, WebKit2GTK on Linux). Pre-built binaries for all platforms are available on the releases page.
For a keyboard-driven terminal experience without the overhead of a graphical application, see the Using the TUI guide.